Skip to content
SecPod  – Documentation
  • Docs Home
  • Categories
    • SanerNow CyberHygiene Platform
    • Products
    • Security Intelligence
    • Supported OSs and Platforms
    • How Tos
    • Release Notes
    • Knowledge Base
    • FAQs
  • Other Resources
  • About SecPod
  • Contact Support
Search this website
Menu Close
  • Docs Home
  • Categories
    • SanerNow CyberHygiene Platform
    • Products
    • Security Intelligence
    • Supported OSs and Platforms
    • How Tos
    • Release Notes
    • Knowledge Base
    • FAQs
  • Other Resources
  • About SecPod
  • Contact Support
  • Docs Home
  • Categories
    • SanerNow CyberHygiene Platform
    • Products
    • Security Intelligence
    • Supported OSs and Platforms
    • How Tos
    • Release Notes
    • Knowledge Base
    • FAQs
  • Other Resources
  • About SecPod
  • Contact Support

SanerNow CyberHygiene Platform

  • Platform Function Guides
  • Getting Started with SanerNow
  • How does SanerNow’s deployment architecture work?
  • Pre-requisites for SanerNow Deployment

Products

SanerNow AVM
  • What’s New in SanerNow?
  • Product User Guides
  • Overview of SanerNow Advanced Vulnerability Management
Vulnerability Management
  • SanerNow Vulnerability Management User Guide
Patch Management
  • SanerNow Patch Management User Guide
Compliance Management
  • SanerNow Compliance Management User Guide
Asset Exposure
  • SanerNow Asset Exposure User Guide
Endpoint Management
  • SanerNow Endpoint Management User Guide
Posture Anomaly Management
  • Data Points IT teams can Fetch from SanerNow Continuous Posture Anomaly Management
  • Posture Anomaly Computation Rules
  • SanerNow Continuous Posture Anomaly Management Tool Product Guide

Release Notes

  • Release Notes SanerNow 5.3.1
  • Release Notes SanerNow 5.3
  • Release Notes SanerNow 5.2
  • Release Notes SanerNow 5.1
  • Release Notes SanerNow 5.0
  • Release Notes SanerNow 4.8.0.0
  • Release Notes SanerNow 4.7.0.0
  • Release Notes SanerNow 4.6.0.0
  • Release Notes SanerNow 4.5.0.0
  • Release Notes SanerNow 4.4.0.0
  • Release Notes SanerNow 4.3.0.0
  • Release Notes SanerNow 4.2.2.1
  • Release Notes SanerNow 4.2.2.0
  • Release Notes SanerNow 4.2.1.0
  • Release Notes SanerNow 4.2.0.0
  • Release Notes SanerNow 4.1.1.0
  • Release Notes SanerNow 4.0.0.5

FAQs

  • Technical FAQs

Security Intelligence

  • List of IoA (Indicators of Attack) covered in SanerNow
  • List of Vulnerability to Exploit/Malware Mapping covered in SanerNow
  • Compliance Benchmark Coverage
  • Application and OS Remediation Coverage
  • OVAL Definitions Family-wise Distribution
  • OVAL Definitions Class-wise Distribution
  • OVAL Definitions Platform Coverage
  • Security Content Statistics
  • Overview of Security Content and Intelligence

Supported OSs and Platforms

  • Supported Third-party Applications for Patching
  • Operating Systems and Platforms Supported

How Tos

General
  • How to enable SSO authentication policy in SanerNow?
  • How to designate saner agent to perform network scan?
  • How to create new mail settings in SanerNow?
  • How to Co-Brand with your logo?
  • How to fetch the details of the mandatory fields from the Okta account?
  • How to create MFA policy for Okta?
  • How to fetch the details of the mandatory fields from the PingID account?
  • How to create MFA policy for PingID?
  • How to fetch the details of the mandatory fields from the PingOne account?
  • How to create MFA policy for PingOne?
  • How to download and install Saner agent in Mac?
  • How to download and install Saner agent in Linux?
  • How to download and install the Saner agent in Windows?
  • How to update the expiry date of an existing subscription?
  • How to manage users and their preferences using role-based access?
  • How to create a new user in SanerNow?
  • How to onboard a new organization?
  • How to uninstall the Saner agent through SecPod Saner deployer?
  • How to deploy the Saner agent through SecPod Saner deployer?
  • How to install a Saner agent through the command line?
  • How to uninstall the Saner agent through command line?
  • How to create a new account in SanerNow?
  • How to sign-up with SanerNow?
Vulnerability Management
  • How to remediate vulnerabilities from vulnerability management dashboard?
  • How to manage excluded vulnerabilities in SanerNow?
  • How to exclude vulnerabilities in SanerNow VM tool
  • How to automate and schedule vulnerability scans?
Patch Management
  • How to manage excluded patches in SanerNow?
  • How to exclude patches in SanerNow PM tool
  • How to automate patch management in SanerNow?
  • How to roll back patches in SanerNow?
  • How to fix firmware in SanerNow?
  • How to apply missing patches in SanerNow?
  • How to check the status of patching activity?
  • How to apply the most critical patches in SanerNow?
Compliance Management
  • How to run a compliance scan?
  • How to custom create a security policy?
  • How to align with PCI security compliance management?
  • How to align with NIST 800-171 security compliance management?
  • How to align with NIST 800-53 security compliance management?
  • How to align with HIPAA security compliance management?
Asset Exposure
  • How to run an asset scan?
  • How to manage asset licenses?
  • How to blacklist and whitelist applications in SanerNow?
Endpoint Management
  • How to investigate total RAM or CPU threshold (greater than or equal to 80%) in Windows systems?
  • How to collect operating systems information in Windows?
  • How to investigate disks running out of space (<100 MB) in Windows systems?
  • How to collect and investigate disk information on Windows systems?
  • How to collect BIOS information such as serial number, version, manufacturer in Windows systems?
  • How to check the status of Windows Update Server (WSUS/SCCM)?
  • How to collect all software patches that are hidden in the Windows Update server?
  • How to collect all installed patches in Windows systems?
  • How to collect all the important missing patches in Windows systems?
  • How to collect mounted disk information on Linux systems?
  • How to check wireless signal quality in Linux systems?
  • How to check wireless security in Linux systems?
  • How to check all firewall policies on Linux systems?
  • How to collect DNS information on Linux systems?
  • How to collect all Dynamic Host Configuration Protocol (DHCP) information on Linux systems?
  • How to collect ARP entries that are created when a hostname is resolved to an IP address and then to a MAC addressing in Linux?
  • How to check wireless signal quality in Windows systems?
  • How to check wireless security in Windows systems?
  • How to collect all open ports in Windows systems?
  • How to collect all network interfaces in Windows systems?
  • How to investigate DNS cache on Windows systems?
  • How to check all firewall policies on Windows systems?
  • How to collect DNS information on Windows systems?
  • How to collect all Dynamic Host Configuration Protocol (DHCP) information on Windows systems?
  • How to collect all the applications with an unknown publisher in Mac systems?
  • How to collect environment variables set in all operating systems?
  • How to collect all families of operating systems such as Windows, Unix, and macOS?
  • How to collect ARP entries that are created when a hostname is resolved to an IP address and then to a MAC addressing Windows?
  • How to collect all software licenses in Mac systems?
  • How to collect all the applications with an unknown publisher in Windows systems?
  • How to collect a list of applications that are started when you boot your computer?
  • How to identify potentially unwanted programs such as torrent downloaders or unnecessary toolbars running on Windows systems?
  • How to collect all software licenses in Windows systems?
  • How to collect all the applications with an unknown publisher in Linux systems?
  • How to perform system tuning?
  • How to enable/disable devices in SanerNow?
  • How to block blacklisted applications in SanerNow?
  • How to delete and quarantine a file?
  • How to deploy software in SanerNow?
  • How to enable and disable firewall settings in SanerNow?
  • How to start and stop the processes in SanerNow?
Continuous Posture Anomaly Management
  • How to create new response in PA tool?
  • How to build your own detection and response in PA tool?
  • How to whitelist an entire PA ID?
  • How to configure Posture Anomaly tool for custom detection?
  • How to fix Anomalies from PA dashboard?
  • How to fix anomalies from PA Summary page?
  • How to fix anomalies detected in your account from All Anomalies Page?
  • How to delete PA scan preferences?
  • How to schedule PA Scans on Daily, Weekly, and Monthly basis?
  • How to launch Posture Anomaly scans?
Reports
  • How to schedule for the report back up?
  • How to create a custom report in SanerNow?
  • How to configure mail settings to email Report PDF?
  • Home
  • Docs
  • How Tos
  • Vulnerability Management
  • How to exclude vulnerabilities in SanerNow VM tool

How to exclude vulnerabilities in SanerNow VM tool

Table of Contents
  • How to Exclude Assets in VM tool
  • How to Enable/Disable, Edit and Delete an existing Exclude Policy in VM tool

SanerNow VM tool will detect and identify all the vulnerabilities that exist in an account. You can see all the detected vulnerabilities displayed on the All Vulnerabilities page. However, there might be scenarios in which you want VM tool to exclude vulnerabilities from certain devices or groups.

VM tool allows you to exclude vulnerabilities. And you can do this namely at – Account, Group(s), and Device(s) level.

Follow the below mentioned steps on how to exclude vulnerabilities at Account, Group(s), and Device(s) levels.

Step 1: On the VM Dashboard, click on All Vulnerabilities which is located at the top right hand side of the page.

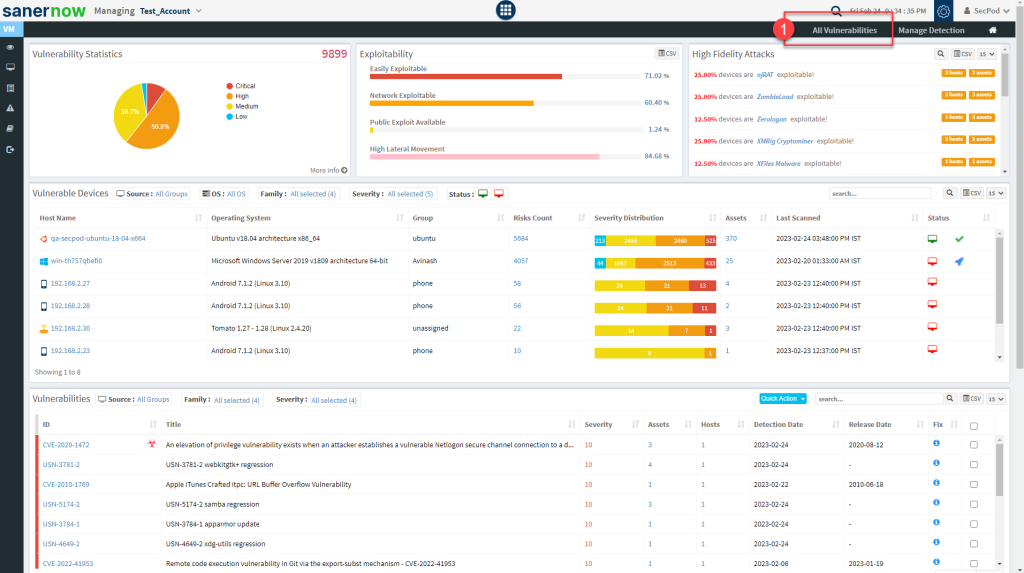
Step 2: You will be directed to the All Vulnerabilities page. Here, you can view all the vulnerabilities found by VM tool.

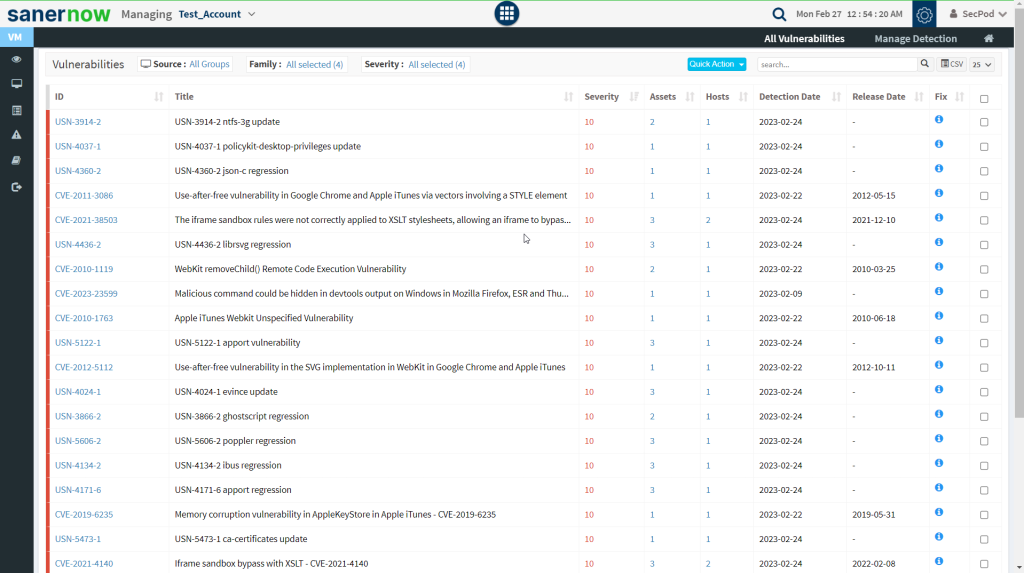
Step 3: Click on the checkboxes displayed towards the right side of the vulnerabilities that you want to exclude. And then click on the Quick Action button.

Step 4: You will see two options when you click on the Quick Action button – 1. Exclude and 2. Remediate.

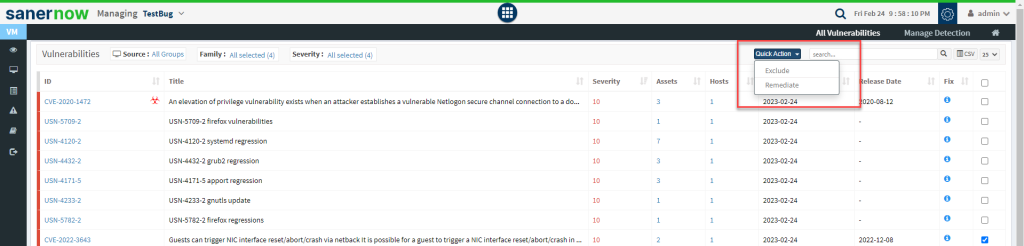
Step 5: Click on Exclude option. You will now be presented with a new pop-up screen.

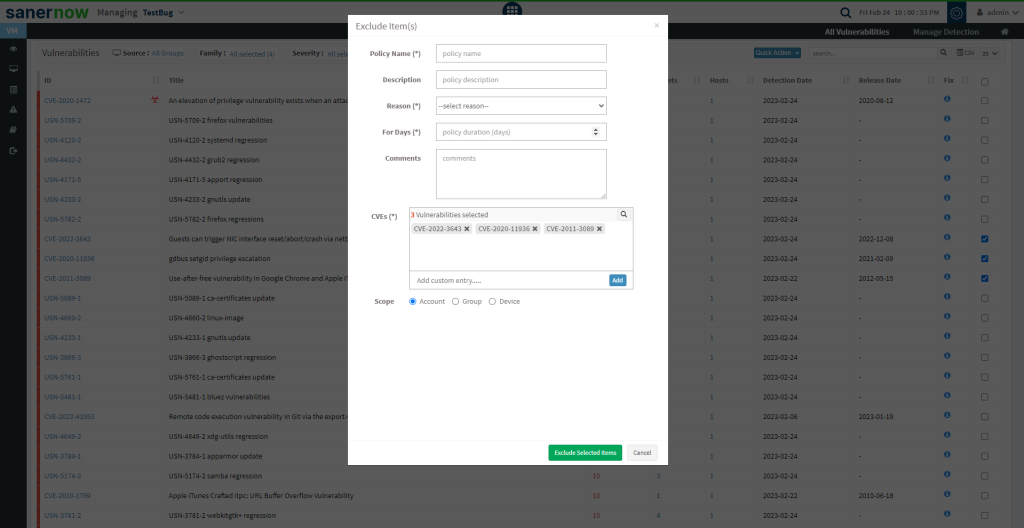
Step 6: You need to fill in information in all the textboxes marked with an asterisk (*). Fill in the required info in the below text boxes.

  • Policy Name – Provide a name for the policy you are creating.
  • Reason – You need to select the reason you want to exclude the vulnerabilities. Select one of the reasons presented by the drop-down box. The following reasons are available for you to choose.
    • False Positive
    • Not Applicable
    • Risk Accepted
  • For Days – Enter the number of days you want VM tool to exclude the vulnerabilities.
  • (You can exclude the vulnerability for minimum 1 day and a maximum for 999 days.)
  • CVEs – Here, you will see all the vulnerabilities you selected to be excluded. At the same time, you can manually add vulnerabilities to be excluded using the Add button.
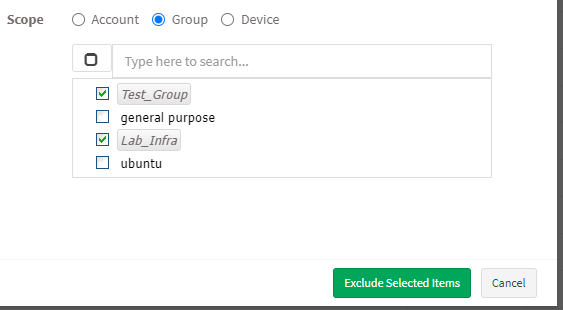
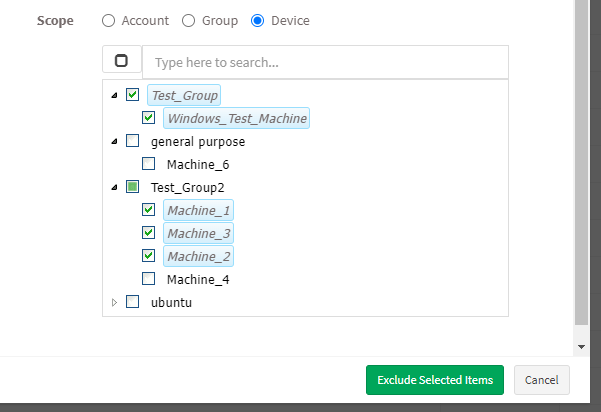
  • Scope – You need to select the scope. You can choose between Account, Group, and Device.
  • Account – When you select Account, the selected vulnerabilities will be excluded from all the devices that are part of the account till the date specified by you.
  • Group – When you select Group, the selected vulnerabilities will be excluded for all the devices that belong to the selected Group(s) till the date specified by you. (You can select multiple groups)
  • Device – You can select one or more devices belonging to various groups to exclude the selected vulnerabilities till the time specified by you. You can select multiple devices belonging to various groups to exclude selected vulnerabilities from them.

Step 7: Once you have selected the Scope, click on Exclude Selected Items button. VM tool will exclude the selected vulnerabilities from applicable devices.

How to Exclude Assets in VM tool #

Step 1: On the VM Dashboard, you can find the Top Vulnerable Assets section located at the bottom left corner of the page. All the top vulnerable assets found in the account are listed here.

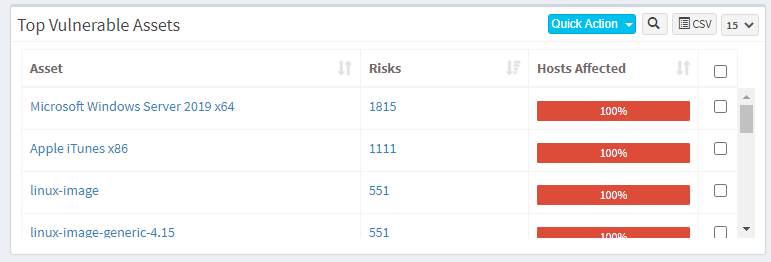
Step 2: You will find the Exclude option when you click on the Quick Action button.

Step 3: You will see two options when you click on the Quick Action button – 1. Exclude and 2. Remediate. Click on Exclude. You will be presented with a new pop-up window.

Step 4: You need to fill in information in all the textboxes marked with an asterisk (*). Fill in the required info in the below text boxes.

  • Policy Name – Provide a name for the policy you are creating.
  • Reason – You need to select the reason you want to exclude the vulnerabilities. Select one of the reasons presented by the drop-down box. The following reasons are available for you to choose.
    • False Positive
    • Not Applicable
    • Risk Accepted
  • For Days – Enter the number of days you want VM tool to exclude the vulnerabilities.(You can exclude the vulnerability for minimum 1 day and a maximum for 999 days.)
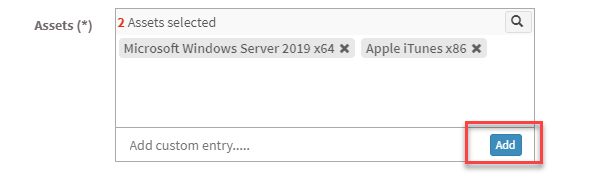
  • Assets – Here, you will see all the assets you selected to be excluded. At the same time, you can manually add Assets to be excluded using the Add button.
  • You need to select the scope. You can choose between Account, Group, and Device.
  • Account – When you select Account, the selected vulnerabilities will be excluded from all the devices that are part of the account till the date specified by you.
  • Group – When you select Group, the selected vulnerabilities will be excluded for all the devices that belong to the selected Group(s) till the date specified by you. (You can select multiple groups).
  • Device – You can select one or more devices belonging to various groups to exclude the selected vulnerabilities till the time specified by you. You can select multiple devices belonging to various groups to exclude selected vulnerabilities from them.

Step 7: Once you have selected the Scope, click on Exclude Selected Items button. VM tool will create the Exclude policy and exclude the selected assets and all the vulnerabilities belonging to the asset from applicable devices.

Note: In VM tool, you can exclude vulnerabilities in various ways. For instance, you can exclude a vulnerability directly from the vulnerabilities table on the VM Dashboard. However, you must follow the steps mentioned above, irrespective of what page or section you use to exclude a vulnerability.

How to Enable/Disable, Edit and Delete an existing Exclude Policy in VM tool #

Step 1: On the VM Dashboard, click on Manage Detection located at the top right corner of the page.

Step 2: You will be presented with a new screen. You can see all the Exclude Policy that exist in the account.

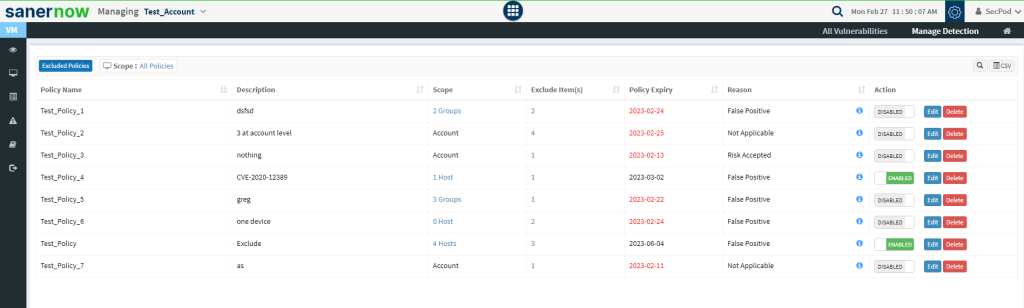
The last column on this page – Action presents you with three buttons namely – a toggle button -Enable /Disable, Edit, and Delete buttons that can be used to control Exclude policies.

ButtonUsage
Using this button, you can enable the Exclude policy.
Using this button, you can disable the Exclude policy.
Using this button, you can edit the Exclude policy.
Using this button, you can delete the Exclude policy.
What are your Feelings
Share This Article :
  • Twitter
  • LinkedIn
Updated on February 28, 2023
How to manage excluded vulnerabilities in SanerNow?How to automate and schedule vulnerability scans?
Table of Contents
  • How to Exclude Assets in VM tool
  • How to Enable/Disable, Edit and Delete an existing Exclude Policy in VM tool
Copyright 2023 - SecPod. All Rights Reserved. Privacy Policy.