Applying security patches is the primary method for eliminating vulnerabilities in software. Patch management involves deciding what patches should be applied and when they should be applied and applying the patches. SanerNow provides access to the latest vendor patches that experts test. With its capability to identify vulnerabilities and map appropriate patches to remove vulnerabilities, SanerNow automates the process of security patch management and keeps endpoint systems up to date. SanerNow also provides crucial information on the severity of detected vulnerabilities, which helps decide whether to apply patches.
Patch Management automates the end-to-end patching tasks from scanning to deployment to reduce the attack surface and enhance security posture effectively. It supports patching for all major OSs such as Windows, Mac, Linux, firmware, and many third-party applications. Patch Management detects all the missing patches for the vulnerabilities across the network. Patch management help to simplify and automate all the patching needs. With the help of smart patching technology, SanerNow provides an end-to-end automated patch management system.
To access the Patch Management tool:
- Log in to SanerNow using your SanerNow credentials.
- Suppose an account already exists and the Saner Agent has been deployed on the endpoints; the organization level dashboard is displayed.
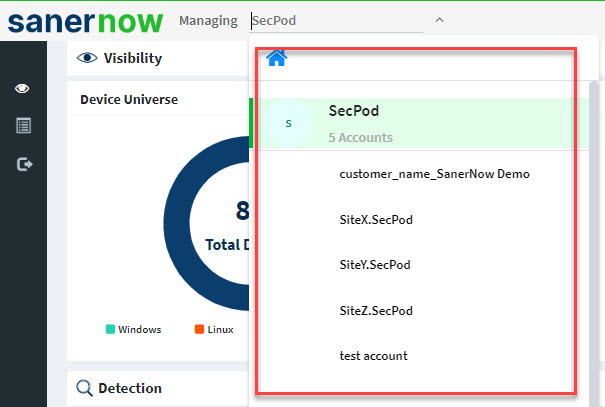
- To select an account, click the drop-down box on the top left corner of the dashboard. The Organizations and the Accounts belonging to the Organization are listed.
- Click the SanerNow tools icon on the header. It will display all the provision tools, as shown below.
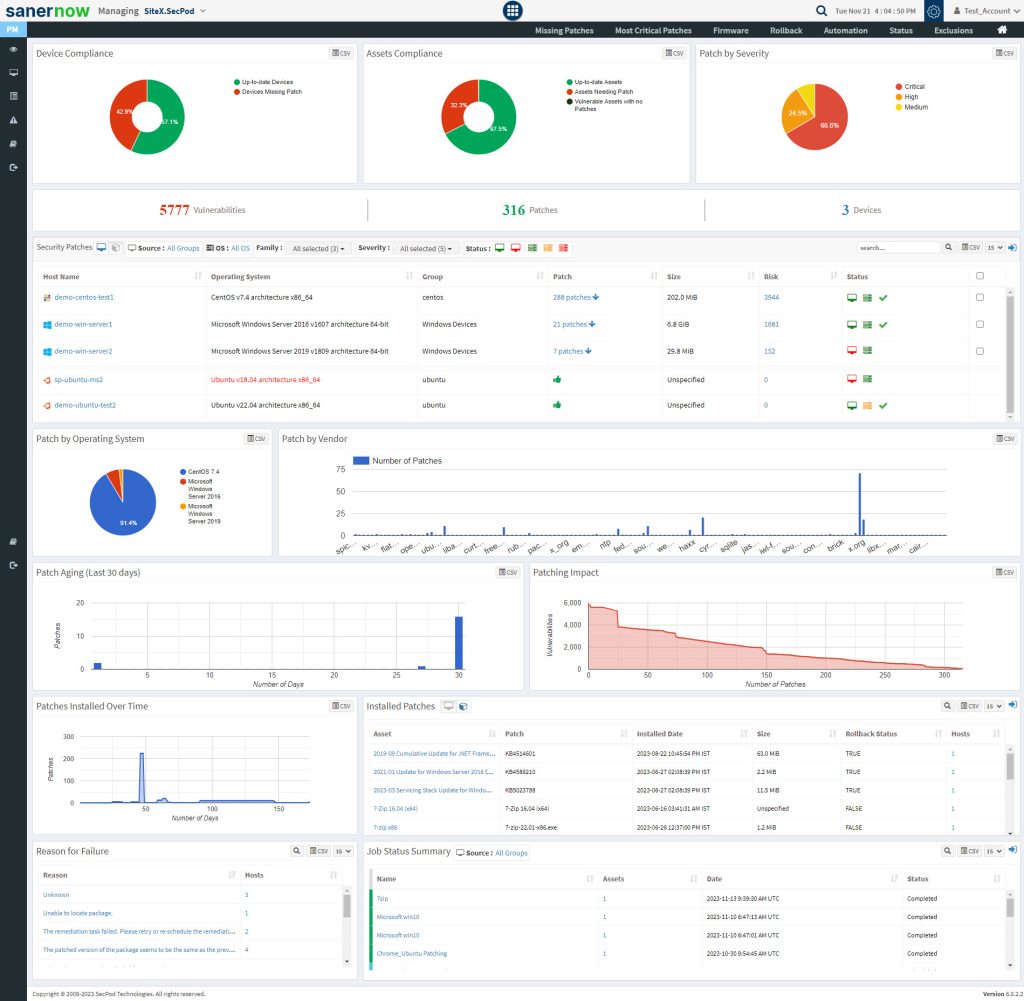
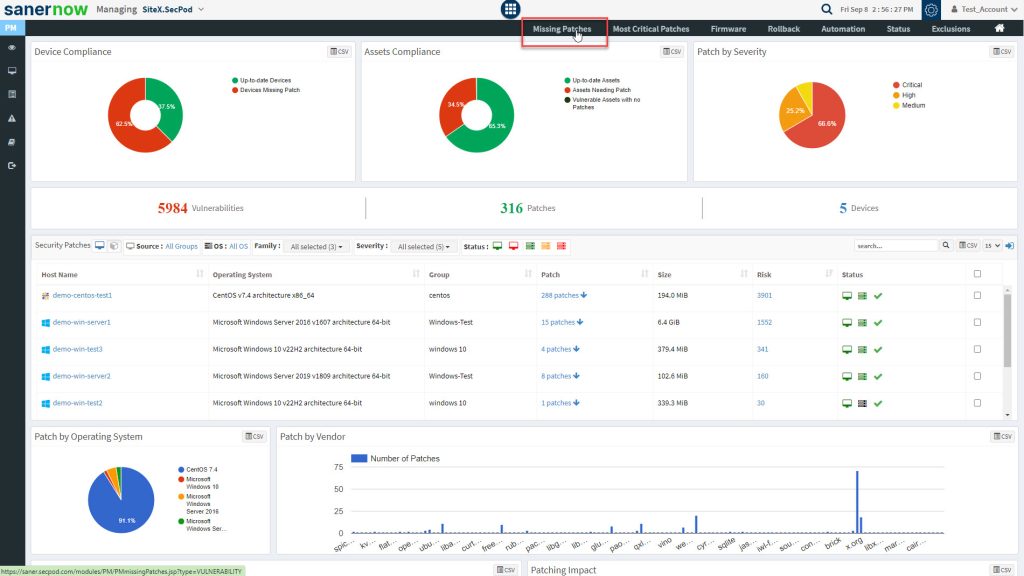
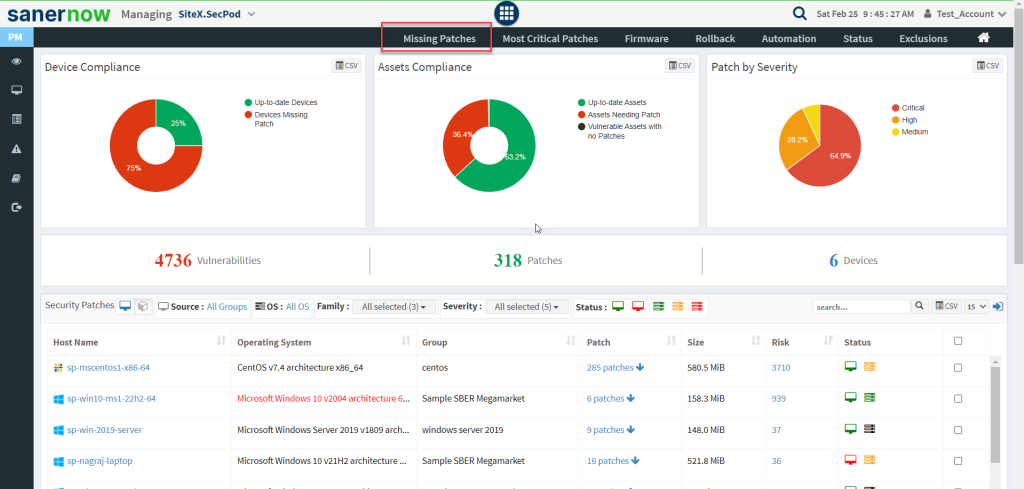
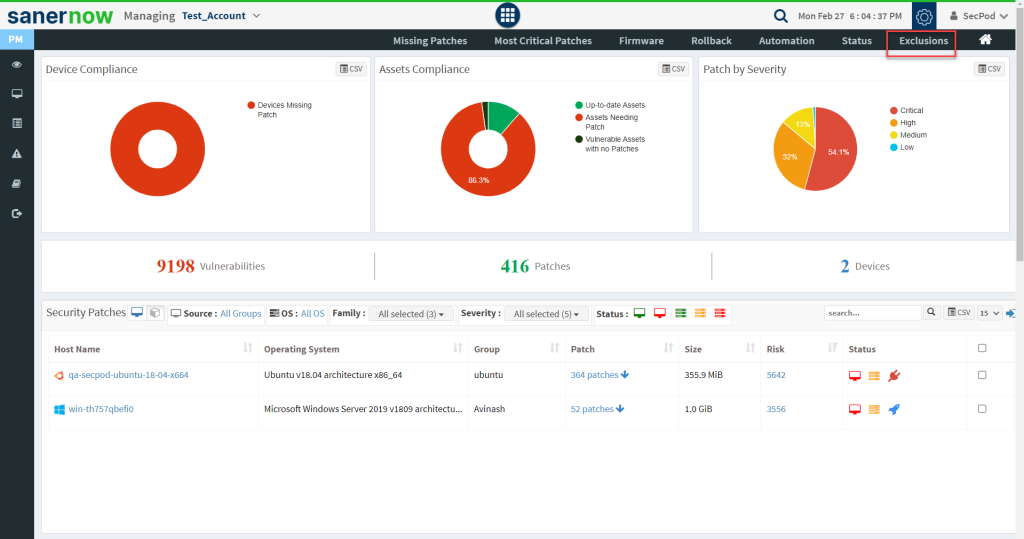
- Click the Patch Management icon. The Patch Management dashboard is displayed, which provides an overview of all devices and patching activities. And it helps you take action to install patches to remediate vulnerabilities.
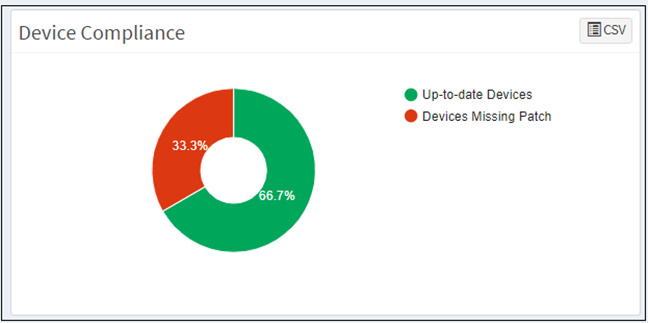
Device Compliance #
This pane shows the device’s compliance posture and highlights the percentage of up-to-date devices and devices that need to apply patches. You can download an excel sheet of non-patched and up-to-date devices by clicking the CSV icon.
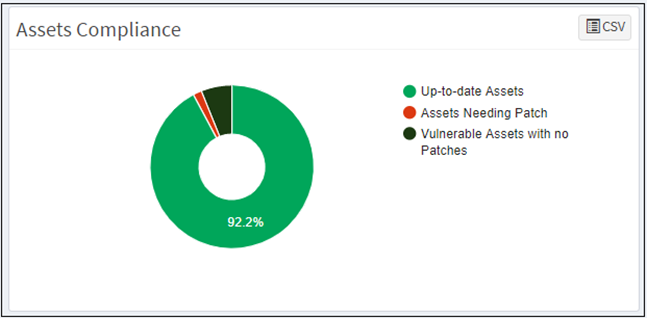
Asset Compliance #
This pane shows the asset’s compliance posture. It highlights the percentage of up-to-date software applications, how many assets need patching activity, and the percentage of vulnerable assets with no patches. You can download an excel sheet of asset compliance details by clicking the CSV icon.
Patch by Severity #
This page shows the patches based on the severity: critical, high, medium, and low. You can download an excel sheet of patch details with severity by clicking the CSV icon.
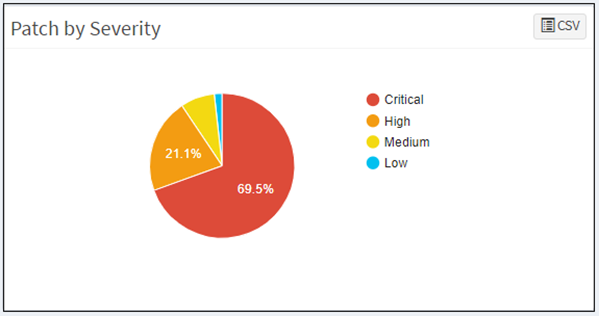
The patch management dashboard also lists the total number of vulnerabilities, the number of patches, and a total number of devices.

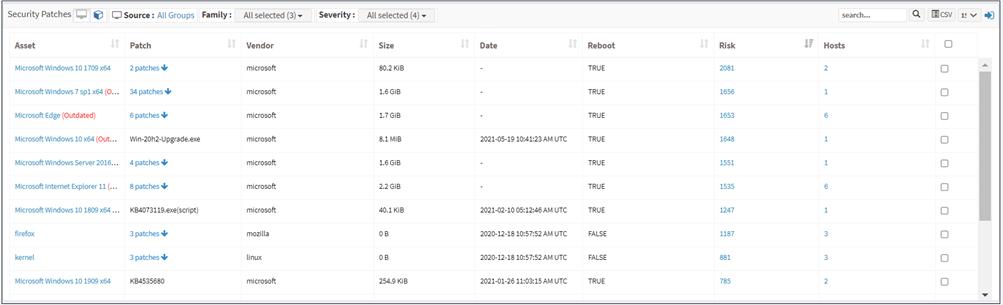
Security Patches #
This pane shows the number of missing patches for devices. Click on the down arrow to expand the missing patches list. Each device’s information, such as operating system, group, size, risk, and device status, is listed on the table. This information will be helpful for a user to deploy the patches. You can apply filters to view the devices based on groups, operating systems, family, severity, the device status. The search option is provided to search the devices with missing patch information with multiple search options.

Security patches based on the devices and assets are displayed on this page. Click on the asset icon to see the missing patches for the assets. This pane shows the level of risk due to the missing patch, the size, date, vendor who publishes the patch, and whether a reboot will be required to apply the patch. It also shows the number of affected hosts. Search and filter options are available to view specific assets. You can download an excel sheet of patch details based on the devices and assets by clicking the CSV icon.
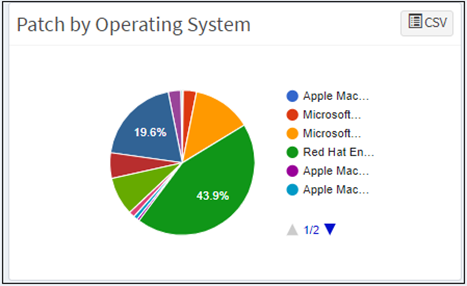
Patch by Operating System #
This pane shows the distribution of missing patches based on the operating system; it lets you see which operating systems in your organization have the most significant number of missing patches. You can download an excel sheet of missing patches segregated based on the operating system by clicking the CSV icon.
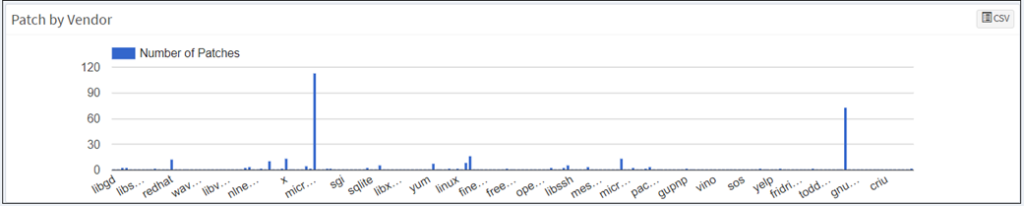
Patch by Vendor #
This pane shows the patches categorized by the vendor, allowing you to understand which assets or vendors have the most updates. You can download an excel sheet of patch details based on the publisher by clicking the CSV icon.
Patch Aging #
This pane shows the number of days since a patch has been available but not applied. You can download an excel sheet of patch details based on age by clicking the CSV icon.

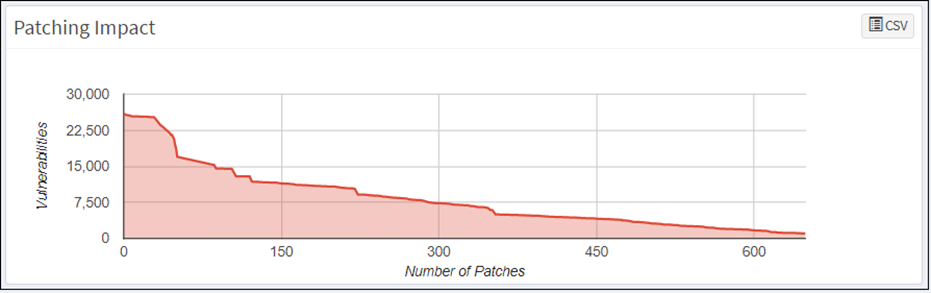
Patching Impact #
This pane highlights the number of vulnerabilities that are removed by applying patches. This helps prioritize patching based on the acceptable vulnerability count, security audits, safety, the criticality of the unpatched systems, etc. You can download an excel sheet of patching impact by clicking the CSV icon.
Missing Patches #
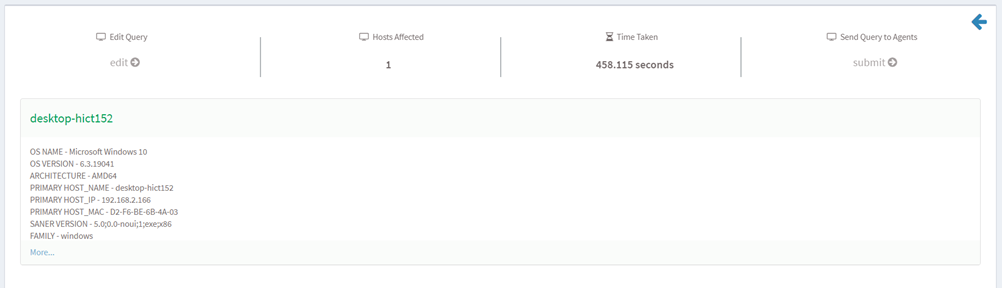
SanerNow detects missing patches through its scheduled or continuous scans. You can set up the scanner to run according to your preferences. You can schedule scans to run at a particular time every day. The patch download time and CPU threshold can also be scheduled. After each Scan, SanerNow displays all details of missing patches, devices, risk levels, etc., to give you an exact picture of what’s happening in your patch management space. This page list the assets with missing patches. It highlights the level of risk due to the missing patch, the size, date, a vendor who publishes the patch, and whether a reboot will be required to apply the patch.
It also shows the number of affected hosts. You will get detailed asset information with patching details by clicking on the asset below.
You can apply filter options to view the list of missing patches by groups, operating systems, family, severity, and type, and you can search for the required device or group. You create multiple remediation jobs and automation rules for a single device or a group of devices.
You can remediate missing patches in two ways:
- As a one-time task to apply patches on a device or devices: You can create a Job every time you need to apply missing patches.
- As an automated task scheduled to apply any missing patches discovered by the last scan executed by the Saner Agent: You can create a scheduled task that will run according to defined parameters. Refer to the Automation section for more details.
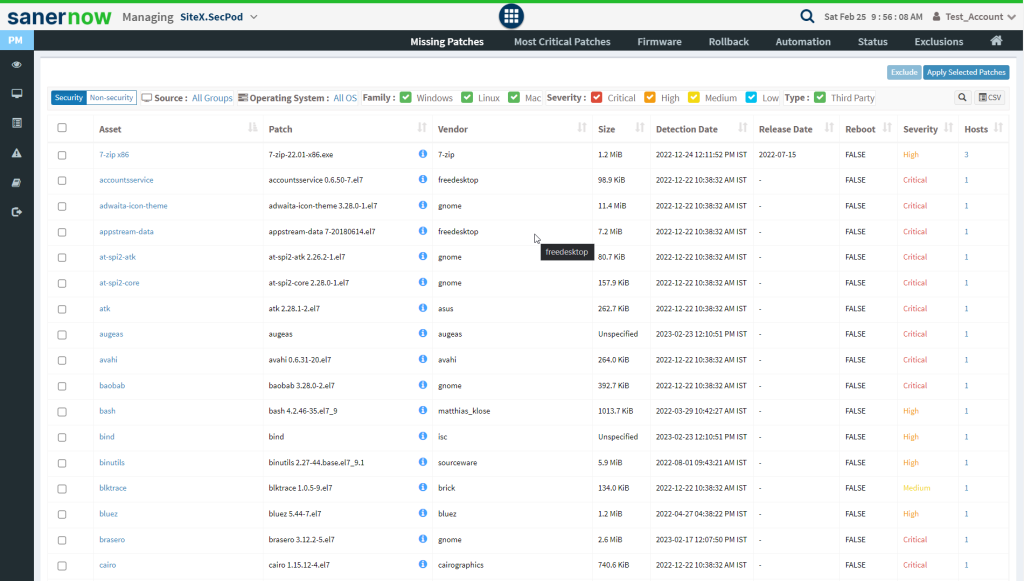
Non-Security Patching for third-party applications. #
SanerNow PM tool supports updating non-security feature updates. for 400+ third-party applications. Follow the below steps to apply non-security feature updates for third-party applications.
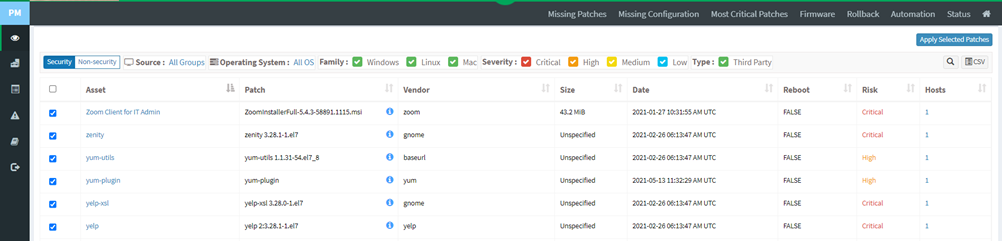
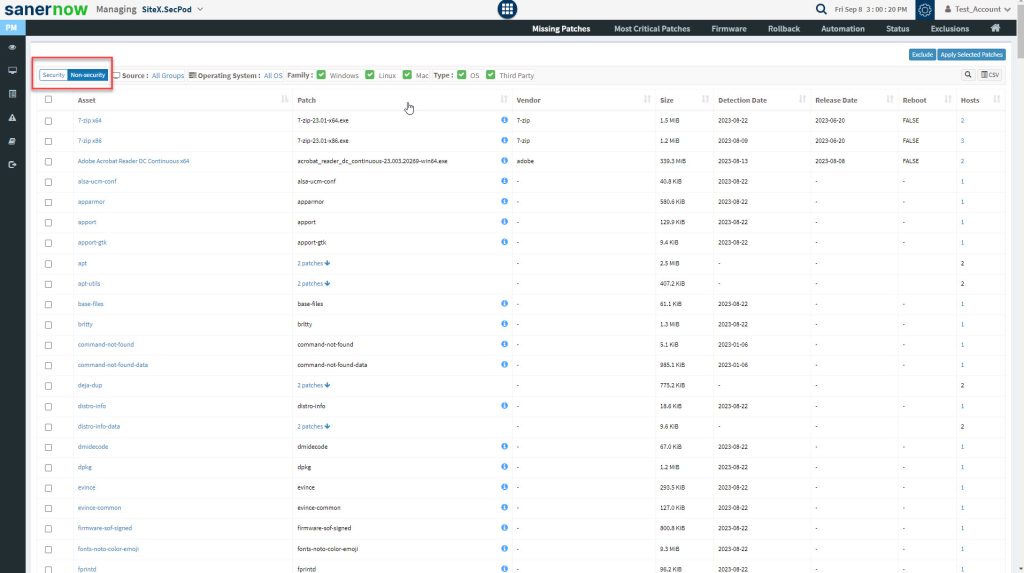
Step 1: Click the Missing Patches button on the SanerNow PM dashboard to navigate to Missing Patches screen.
Step 2: On the Missing Patches screen, select Non-security option on the left-side of the screen.
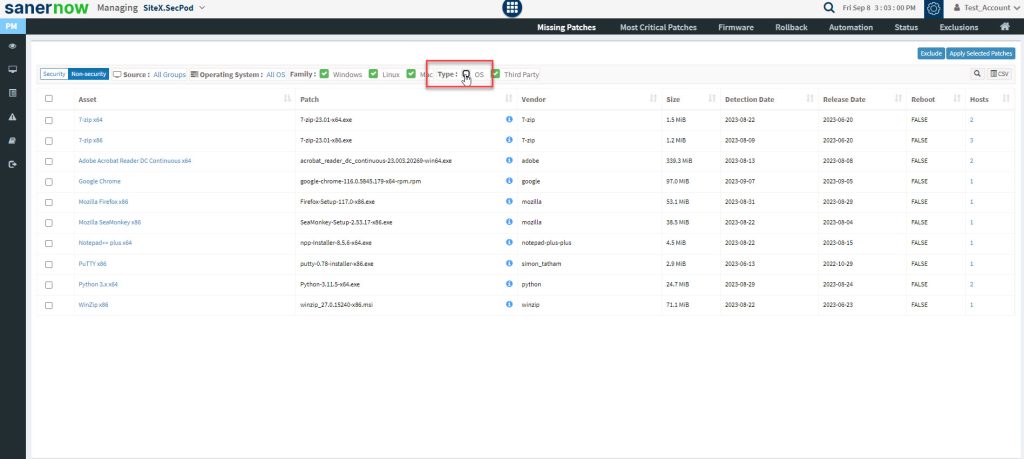
Step 3: Uncheck the OS checkbox to display non-security patches available for third-party applications present in the Account.
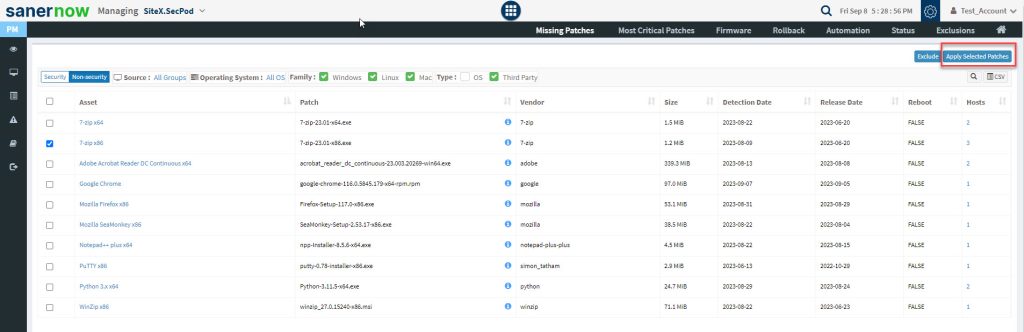
Step 4: Select the application and click the Apply Selected Patches button.
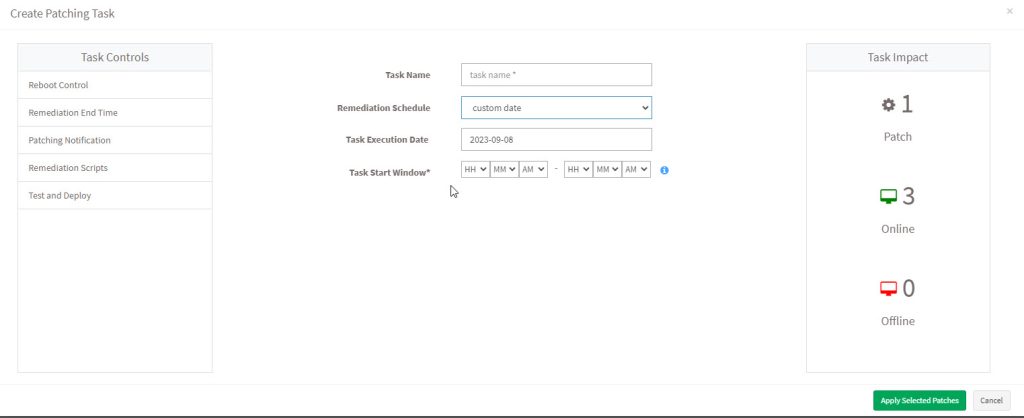
Step 5: You will be directed to Create Patching Task screen. Here, on this screen, you need to specify the Task Name and Remediation Schedule – the timeframe during which you want the patches to be applied. You can choose between the following remediation schedules:
- Immediate — When the remediation schedule is selected as Immediate, the SanerNow PM tool will immediately perform the patching task.
- After Scheduled Scan —- When the remediation schedule is selected as After scheduled Scan, the SanerNow PM tool will perform the patching task once the SanerNow Agent completes the scheduled scan.
- Custom date —- When the remediation schedule is selected as Custom Date, you need to specify the Task Execution Date – the date on which you want the SanerNow PM tool to perform the patching task. At the same time, you need to provide values for Task Start Window (Task start window is a time period during which a task is allowed to start running. For example, a task might have a start window of 09:00 PM to 11:00 PM, which means that the task is allowed to start anytime within that time range. If the device is offline during the start time window, Task will not be taken up and will be reported as Scheduled missed.)
Step 6: Click the Apply Selected Patches button and the patching task is created.
Exclude Patches #
SanerNow PM tool will detect and identify both security and non-security patches for the devices that exist in your account. However, there might be scenarios in which you want PM tool to exclude certain patches from being applied to devices.
PM tool allows you to exclude patches. And you can do this namely at – Account, Group(s), and Device(s) level.
Follow the below mentioned steps to exclude patches at Account, Group(s), and Device(s) levels.
Step 1: On the PM Dashboard, click on Missing Patches which is located on the top section of the page.
Step 2: You will be redirected to the Missing Patches page. Here, you can see all the missing patches that include both security and non-security ones.
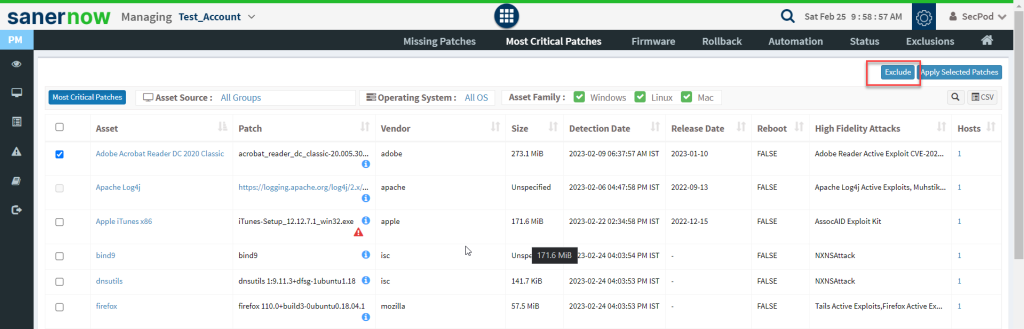
Step 3: Select the patches you want to exclude from being applied and then click on the Exclude button located at the top right corner.
Step 4: You will be presented with a new pop-up window once you click on Exclude button.

Step 5: You need to fill in information in all the textboxes marked with an asterisk (*). Fill in the required info in the below text boxes.
- Policy Name – Provide a name for the policy you are creating.
- Reason – You need to select the reason you want to exclude the selected patches. Select one of the reasons presented by the drop-down box. The following reasons are available for you to choose.
- Not Applicable
- Risk Accepted
- For Days – Enter the number of days you want PM tool to exclude the patches.
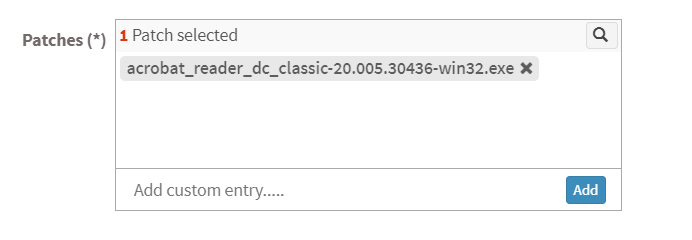
- (You can exclude the vulnerability for minimum 1 day and a maximum for 999 days.) Patches – Here, you will see all the patches you selected to be excluded. At the same time, you can manually specify the name of the patch you want to be excluded using the Add button. If the patch you specified exists with the same name, it will be excluded.
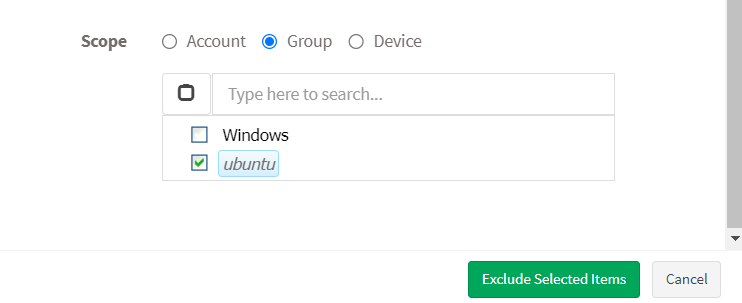
- Scope – You need to select the scope. You can choose between Account, Group, and Device.

- Account – When you select Account, the selected patches will be excluded from all the devices that are part of the Account till the date specified by you.
- Group – When you select Group, the selected patches will be excluded for all the devices that belong to the selected Group(s) till the date specified by you. (You can select multiple groups).
- Device – You can select individual devices belonging to various groups to exclude the selected patches till the time specified by you. You can also select multiple devices belonging to various groups to exclude selected patches from them.
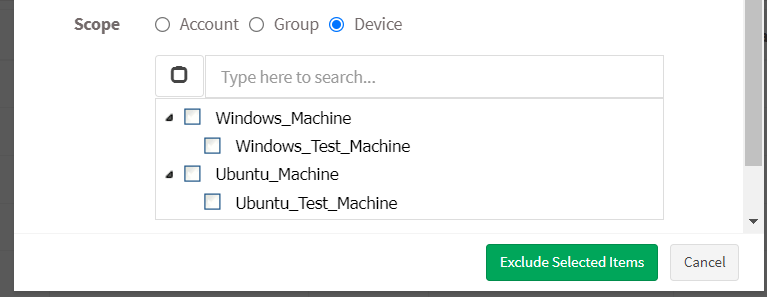
Step 7: Once you have selected the Scope, click on Exclude Selected Items button. PM tool will run a scan and exclude the selected patches from applicable devices.
Note: In PM tool, there are multiple ways to exclude patches. For instance, you can exclude patches from Missing Critical Patches page and from the PM Dashboard. However, you need to follow the same steps mentioned in this guide irrespective of which page you use to exclude patches.
How to Enable/Disable, Edit and Delete an existing Exclude Policy in PM tool #
Step 1: On the PM Dashboard, click on Exclusions located at the top right corner of the page.
Step 2: You will be presented with a new screen. You can see all the Exclude Policies that exist in the account.
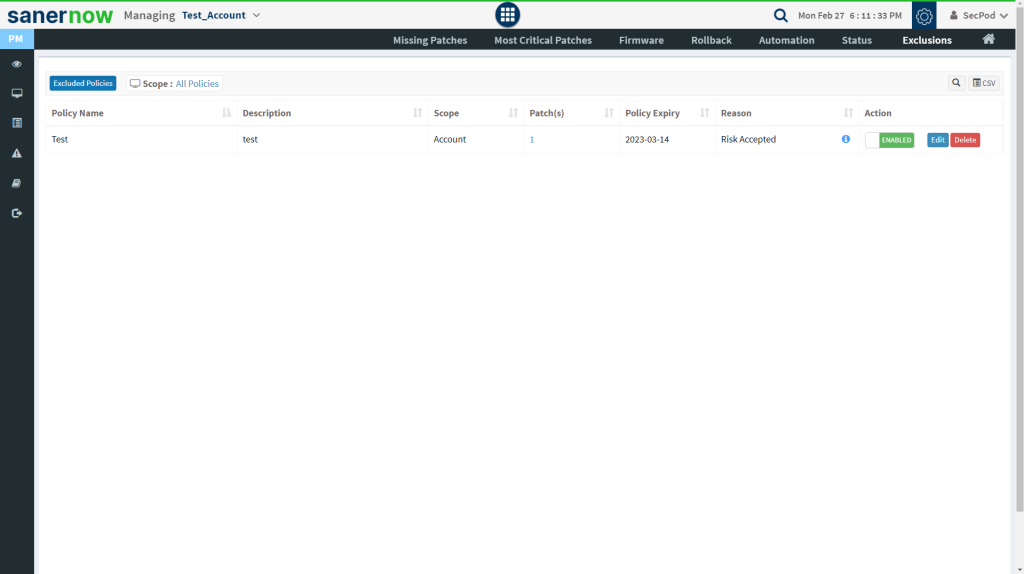
The last column on this page – Action presents you with three buttons namely – a toggle button -Enable /Disable, Edit, and Delete buttons that can be used to control Exclude policies.
| Button | Usage |
 | Using this button, you can enable the Exclude policy. |
 | Using this button, you can disable the Exclude policy. |
 | Using this button, you can edit the Exclude policy. |
| Using this button, you can delete the Exclude policy. |
To create a task for apply missing patches:
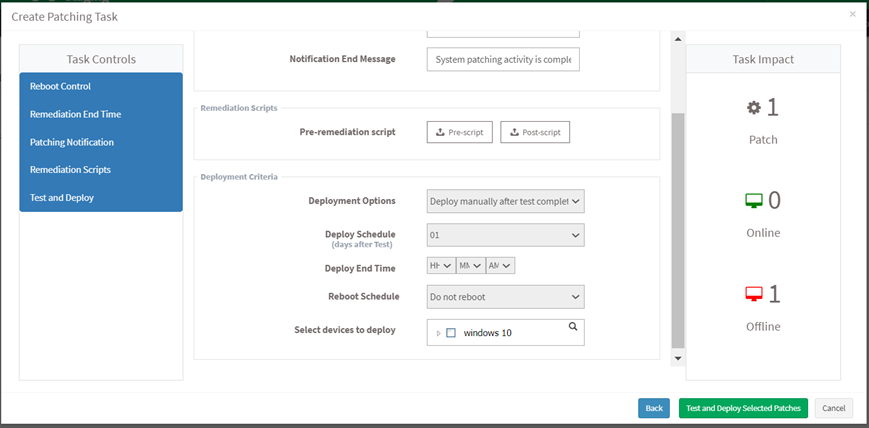
- Select the patches you want to install. Click on the Apply Selected Patches button at the top right corner of the missing patches page. The Create Patching Task dialog is displayed as shown in the below image.

- Specify a task name, provide patching notification messages, and select remediation scripts.
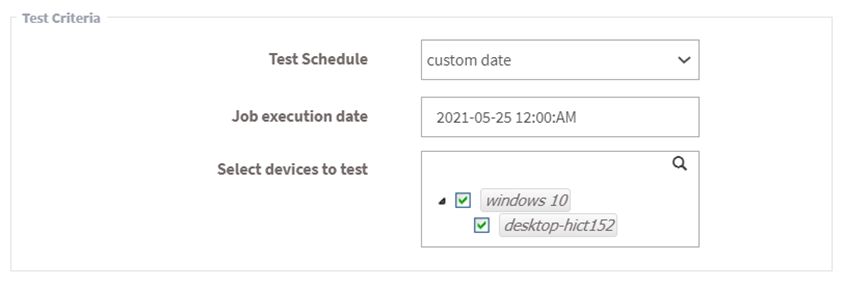
- Select test criteria as shown in the below image.

- Schedule the job immediately or after a scan and set the time counter accordingly in the test schedule fields. You can also choose to set the job to execute on a different date.
- Click on the Next button. Specify the details in the Deployment Criteria section. Click on the Test and Deploy Selected Patches button.

You will get a confirmation message that you created the job successfully.
SanerNow supports patch management for Windows, Linux, Mac operating systems, and third-party applications.
Operating System Patches
- Microsoft Updates
Patch Management for Microsoft updates works in two ways:
WSUS Server
If a Windows update is configured to contact the WSUS Server, the Saner agent directly contacts the WSUS Server to get the latest available patches. Otherwise, it will contact the Microsoft Update Server.
Default Microsoft Update Server
If a Windows update is configured to contact the Microsoft Update Server, the Saner agent directly contacts the Microsoft Update Server to get the latest available patches.
- Linux Machines
For RPM Machines
The Saner solution uses the YUM repository to install RPM package updates, which contacts the respective server to get the latest patches.
For DPKG Machines
SanerNow uses the apt-get package, a default package present in dpkg machines. The agent contacts the respective update server to get the latest patches.
- Mac OS X Packages
SanerNow uses the software update command to update OS X packages. The agent contacts the MAC OS X Update Server.
Third-party Application Patches
The Saner solution supports the following 97 applications for Patch Management. The application list is constantly updated.
| • All Microsoft products • All Linux distros packages • All Mac OS X packages • Activeperl • Adobe AIR • Adobe Acrobat for Mac • Adobe Flash Player Npapi • Adobe Flash Player Ppapi • Adobe Flash Player ActiveX • Adobe Shockwave Player • Adobe Reader • Adobe Reader DC continuous • Adobe Reader DC classic • Adobe Brackets • Adobe Acrobat DC Classic for Mac • Adobe Acrobat DC Continuous for Mac • Adobe Digital Editions • Apple iTunes • Apple iCloud • Apple iBooks Author • Apple QuickTime • Apple Safari • Audacity • AIMP • AnyDesk(Windows) • Cacti • Calibre • Ccleaner • Citrix Receiver • Dell SupportAssist • Dropbox • Docker for Linux • Elasticsearch • Evernote • FlashGet • Foxit Reader | • Google Chrome • GhostScript • Google Earth • Google Picasa • Google SketchUp • Gitlab-ce • Gitlab-ee for linux • Git for windows • iTerm2 for mac • Inkscape • K-meleon • Kubernetes linux • Kibana for linux • LibreOffice • Lan Messenger • Lenovo System Update • Mozilla Firefox ESR • Mozilla Thunderbird ESR • Mozilla FireFox • Mozilla SeaMonkey • Mozilla Thunderbird • MySQL • Microsoft Visual Studio Code • MySQL Connector/Net • Malwarebytes • Notepad++ • OpenVPN Client • Opera • Oracle Java JDK/JRE • Oracle VirtualBox • OpenSSH • OpenSSL • Open Office | • Palemoon • Puppet Agent • Pidgin • PostgreSQL • Putty • Python • Powershell • RealPlayer • RealVNC • Skype • Sumatra PDF • TheHive Project Cortex analyzer for linux • TeamViewer • TightVNC • Trillian • UltraVNC • VMware Player • VMware Movie Decoder • VLC Media Player • Vmware Tools • Vsphere Client • Win amp • WinRAR • WinZip • Winscp • Wireshark • .net core • 7Zip |
Most Critical Patches #
This page lists the most critical patches to the security of the system and organization so that you can prioritize patching. It highlights the size, date, vendor who publishes the patch, and whether a reboot will be required to apply the patch.
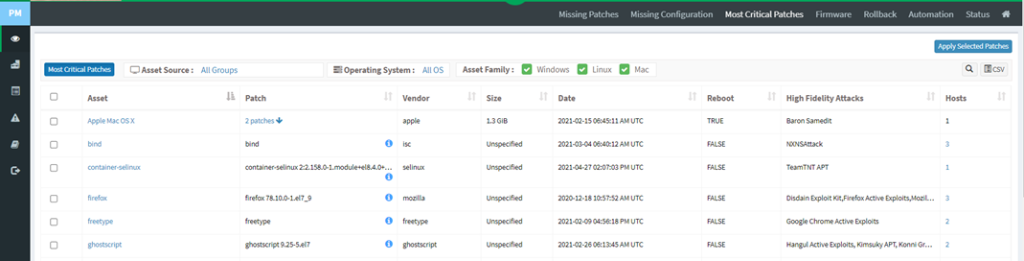
To apply critical patches
- Select the patches you want to install. Click on the Apply Selected Patches button at the top right corner of the missing patches page. The Create Patching Task dialog is displayed as shown in the below image.
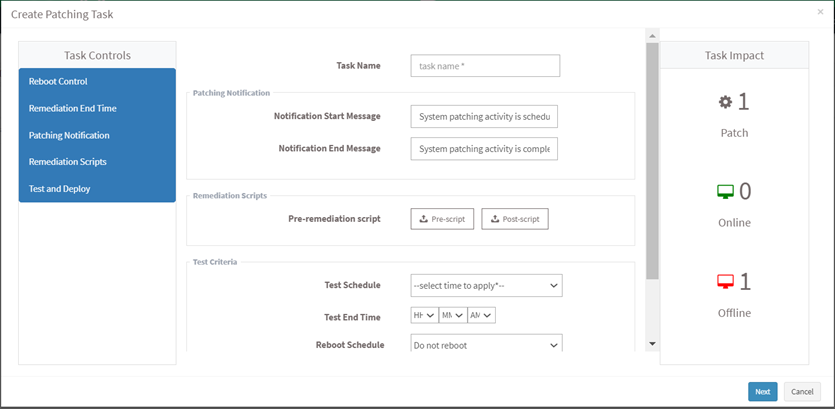
- Specify a task name, provide patching notification messages, and select remediation scripts.
- Select test criteria as shown in the below image.
- Schedule the job immediately or after a scan and set the time counter accordingly in the test schedule fields. You can also choose to set the job to execute on a different date.
- Click on the Next button. Specify the details in the Deployment Criteria section. Click on the Test and Deploy Selected Patches button.
You will get a confirmation message that you created the job successfully.
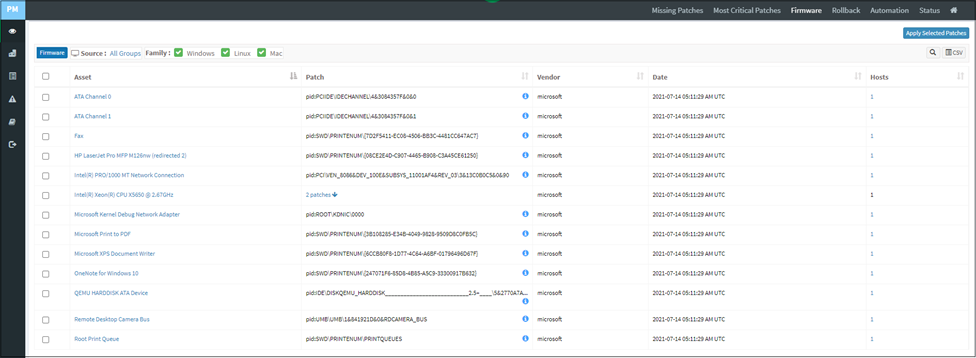
Firmware #
A comprehensive set of patches that cover software and firmware across all nodes to reduce vulnerabilities and security risks to the organization. This page lists assets with the patching details, a vendor who publishes the patch, date, and affected hosts. The filter and search options are provided to view the specific assets. Click on the Apply Selected Patches to create a new patching task. You can download the excel sheet of assets with patching details by clicking on the CSV icon.
Patches Installed Over Time #
This pane shows the number of vulnerable patches that have been installed over time so that the organization has a patch history. The history will help to understand its security health and plan its actions. You can download an excel sheet of patches installed over time by clicking the CSV icon.

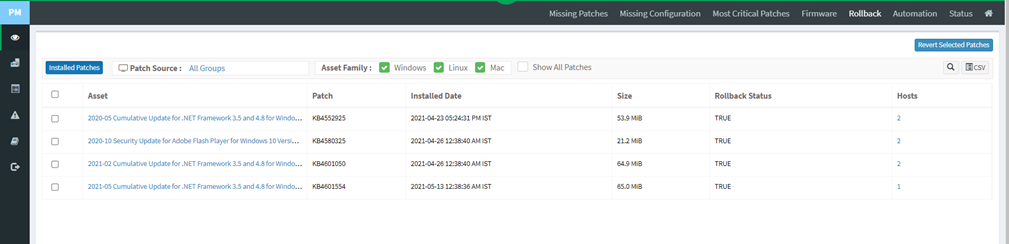
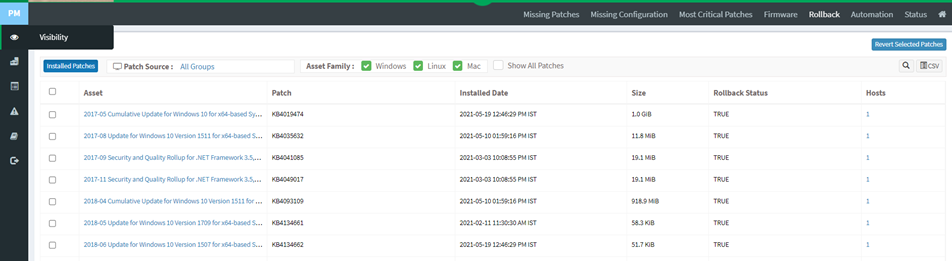
Installed Patches #
This page shows a list of patches applied for assets, the installation date, the size of the patch, the rollback status, and the system that has the asset. The asset view shows detailed information on vulnerable patches already installed on assets.
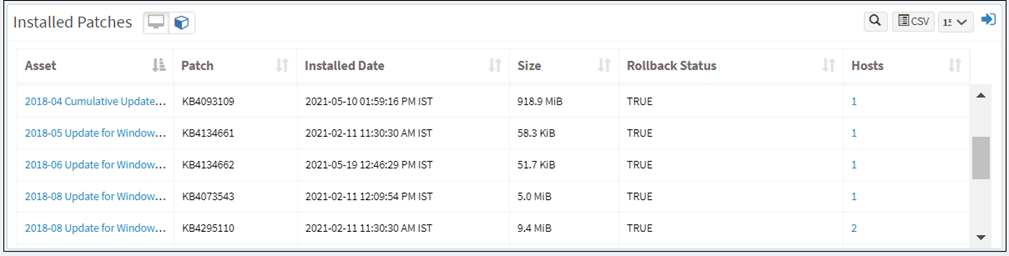
A toggle option is provided in the installed patches pane to switch between Device and Asset view. The device view shows detailed information on vulnerable patches installed on devices, as shown below.
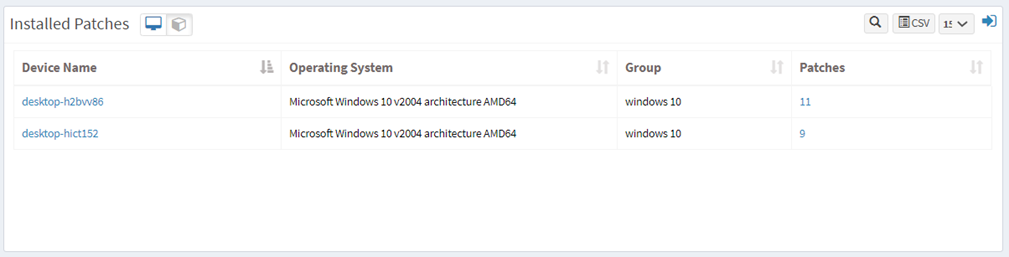
Click the expand icon if you want to rollback any patches. The Installed Patches page is displayed. You can filter the list of installed patches by groups of devices to traverse the list quickly, or you can search for the required device or group.
Rollback #
Click on the Rollback option at the top right corner of the PM page. It will list the installed patches for each device and asset.
- Select the assets you want to rollback patching and click on the Revert Selected Patches button.
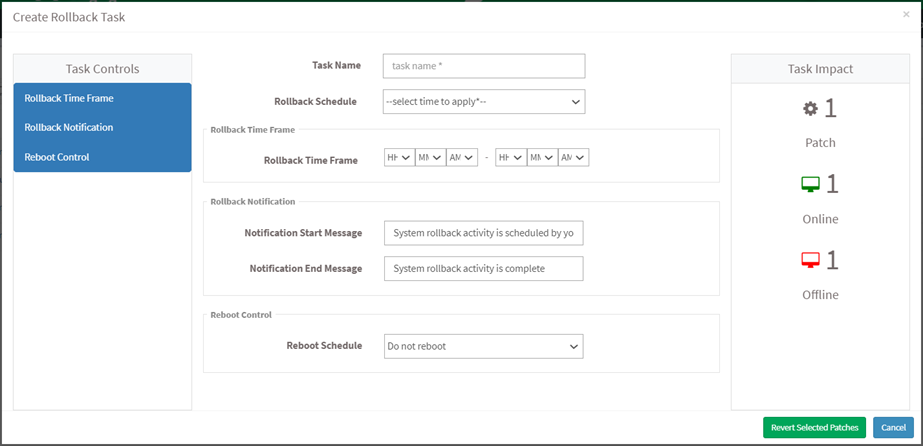
The Create Rollback Task dialog is displayed.
- Specify a job name and select rollback schedule from the drop-down menu.
- Specify whether you want the job done immediately or after a scan and set the time counter accordingly. You can also choose to set the job to execute on a different date.
- Provide the rollback notification message to display when the task is completed.
- Click on the Revert Selected Patches button after specifying the details.
Automation #
SanerNow offers a reboot schedule function integrated with its patch automation rules. To run the latest version without delays, you can schedule monthly, weekly, or scheduled reboots according to your requirements. SanerNow supports new patches offered by vendors within 24 hours of release to ensure quick risk mitigation. All patches are pre-tested to check for any compatibility issues and errors. When a vendor releases an important update, SecPod also sends out email alerts to ensure you do not miss them. After the patches are deployed, SanerNow performs a final patch verification on the device to check the patch status. SanerNow also packs additional handy features such as patch rollback to provide further control over patch jobs.
To install missing patches using an automated task, click on the Automation button at the top of the PM page. The Automation page will display the list of vulnerable assets with the publisher’s details.
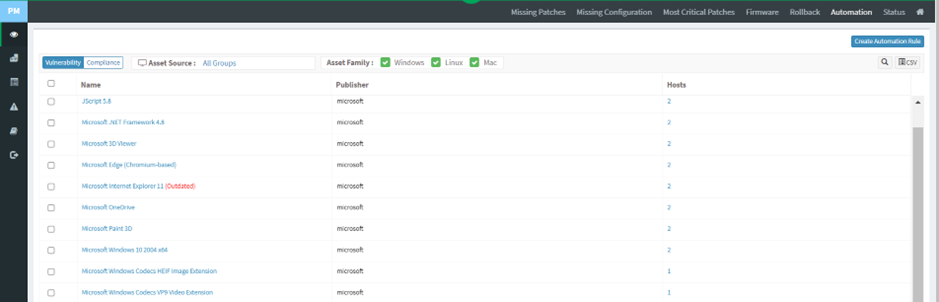
Select an asset that you want to mitigate vulnerabilities automatically and click on the Create Automation Rule button to schedule a task. Schedule a Task dialog is displayed as shown in the below image.
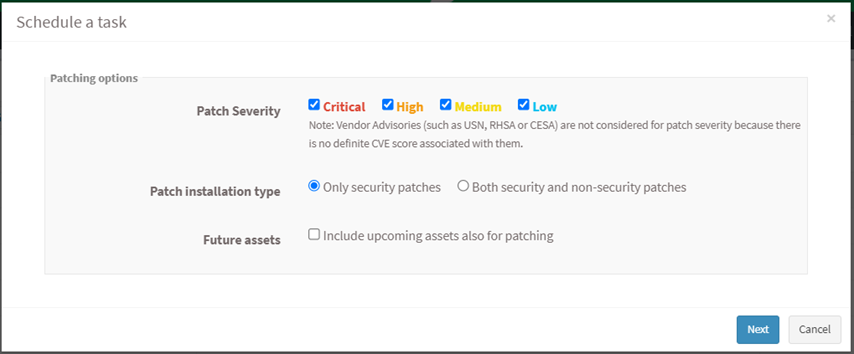
Select patches based on severity and patch installation type, and click on the Future assets check box if you want to remediate future assets. The vulnerabilities will be remediated based on the above options provided by the user. Click on the Next button.
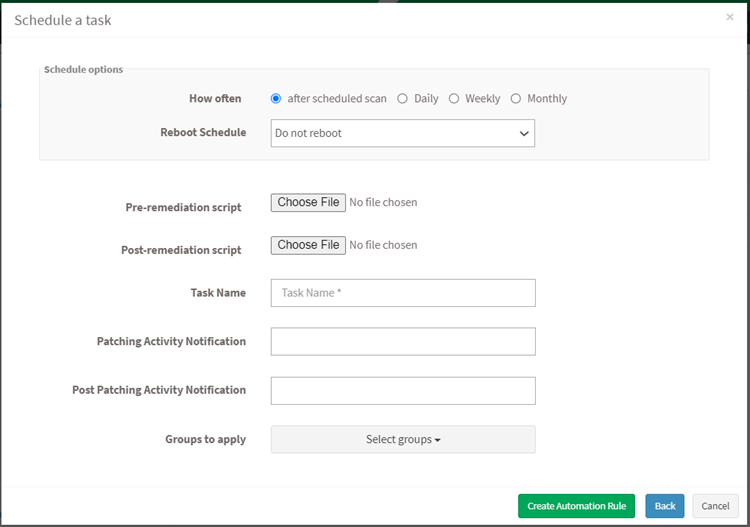
The user can schedule a remediation task based on his timing. Specify how often you need to run a scan and select the option to reboot. Choose to set the task to execute on a different date, weekly, monthly, or daily. If weekly, specify the dates and times. If monthly, specify the dates and times. Select scripts to run while rebooting, specify the task name and provide the patching notification message to display after completing the activity. You can also select groups to apply the rule settings. Click on the Create Automation Rule button, and a remediation task will be created. The remediation task will run automatically based on the scheduled timing.
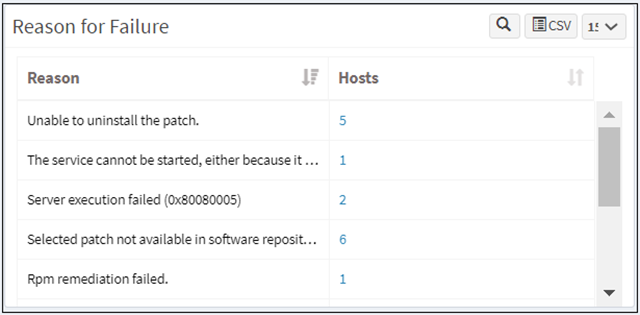
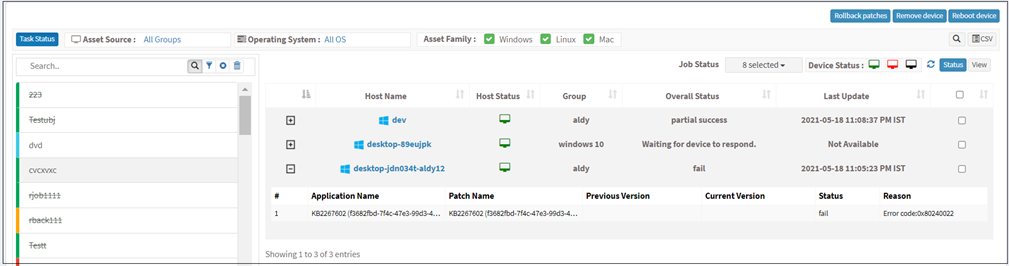
Reason for Failure #
Sometimes, patches may not be successfully installed during patch management. This pane shows the number of hosts on which the patch has failed and categorizes the failed patches under remediation errors, application errors, device errors, download errors, etc. Click the host number or name to see more detail, such as which job failed or which patch was not installed.
Job Status Summary #
This page shows the status of all the remediation tasks and patch installation or rollback jobs that were scheduled.
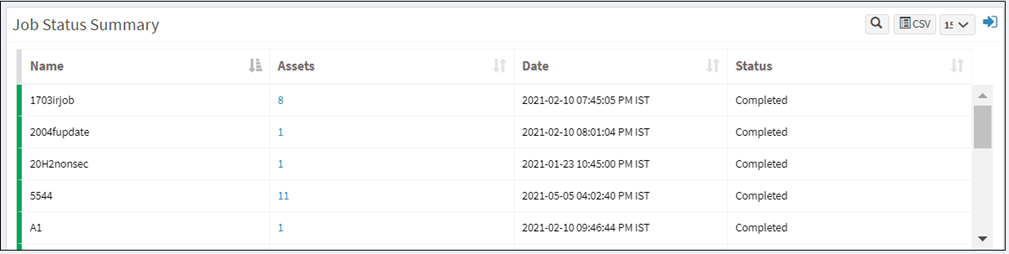
Click the Expand icon to see a list of all scheduled patch and rollback jobs. Click on any job to view the completion status of the job or the job creation information.
Status #
Since patching is not a one-person and one-time task, they need to be executed and tracked continuously as a process. SanerNow accelerates each stage of the patching process with automation and additional features to quicken the process with minimal supervision. You can create specific patch jobs for a group of devices and track them to finish.
You can automate patching for specific operating systems (Windows, Mac, Linux), third-party applications, and firmware. Create jobs according to OSs, single/groups of applications, and department (device groups and Active Directory hierarchy). It can automate the entire patching cycle according to pre-set rules and conditions.
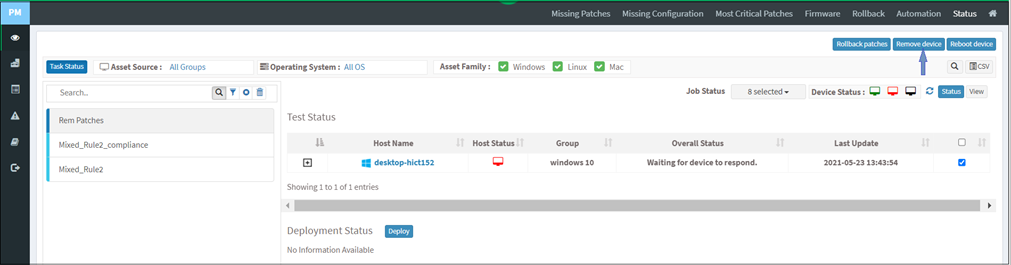
Users can rollback patches, remove devices, and reboot devices from the Status page. To remove a job applied for the device, select a device, and click on the Remove Device button.
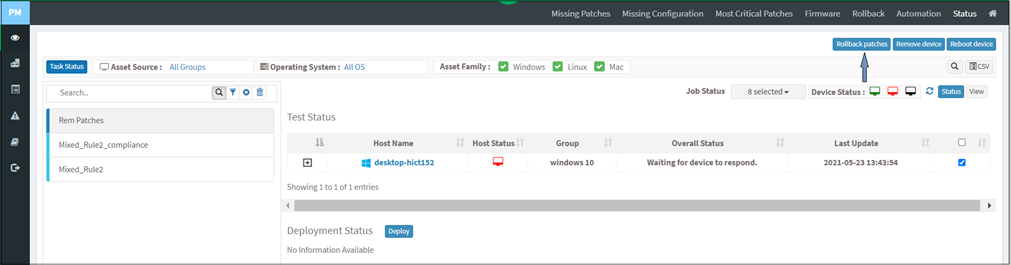
Select a device and click on the Rollback patches button to apply patches to the device.
Select a device from the device list and click on the Reboot Device button. Specify the task name, reboot message, and select schedule options as immediate or custom date. Click on the Reboot button.

You can scan devices manually at any time. Once the scan is done, and vulnerabilities are known, remediation is performed by creating a job. The remediation job includes vulnerable/non-compliant assets that can be applied to groups. The remediation job can be executed immediately, scheduled on a particular date, or performed after the scheduled scan.
To Scan Devices Manually
1. Click Manage > Devices > Managed Devices.
2. Select device groups and click on the Scan Now button.
Once the Remediation Job is executed, you can generate a patch report again after 20-30 minutes. Compare this report with the report generated prior to the remediation job to identify how many hosts were affected and how many hosts have been remediated successfully.
Setting Alerts for Patch Management #
To stay on top of the patching tasks vital to maintaining security, you can set alerts.
To Set Alerts for Patch Management
- Click Alerts > Patch Management.
- Set the Subscription status to On.
- Specify the email address to which you want the alerts sent.
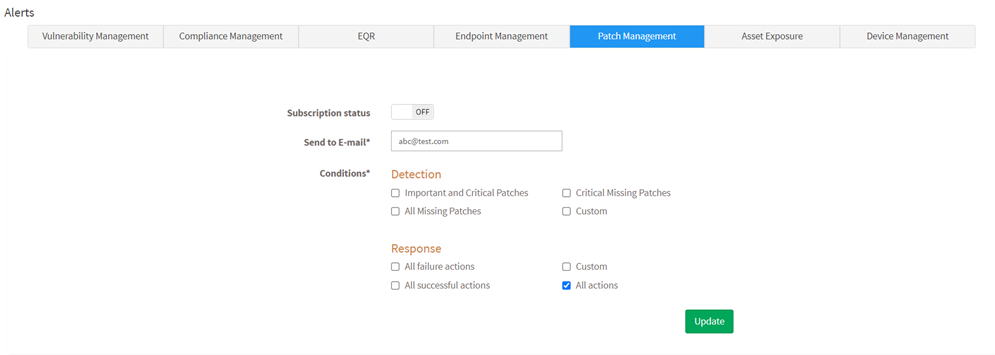
- Specify which conditions you want to receive detection and response alerts.
- You can choose to receive alerts related to detection – Important and Critical Patches, All Missing Patches, Critical Missing Patches, and Custom: If you select custom, you must specify the custom values in the Custom Detection box.
- You can choose to receive alerts related to response – All failure actions, All successful actions, All actions, and Custom. You must specify the custom values in the Custom Detection box if you select custom.
- Click on the Update button to complete the settings.
Patch Report #
The patch report summarizes all the patch information, such as the missing patches, the critical patches, etc.
To generate a patch report
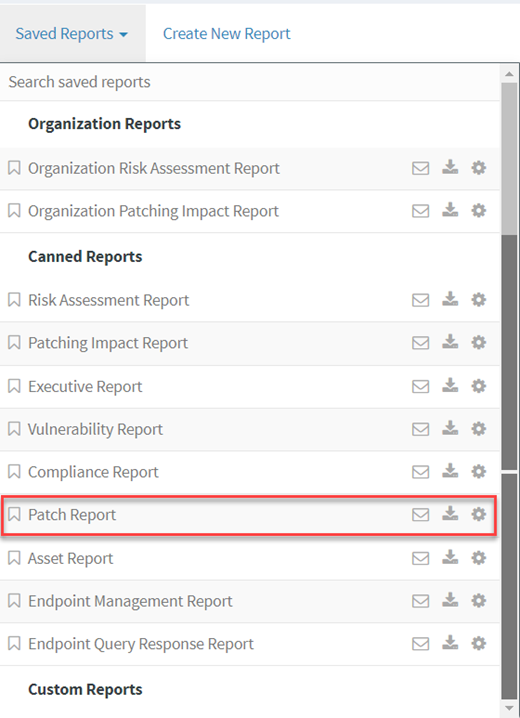
- Click on the Reports > Saved Report > Patch Report.
To export the report to a PDF.
- Click on the Download icon to download the PDF report.
To export the report and send it via email:
- Click on the Mail icon in the saved report section to email the report.
- Specify the email addresses.
To Back Up Reports #
The backup settings under Reports allow IT, administrators, to obtain report backup. The backup report can be scheduled to run automatically daily or weekly.
To Back Up Reports
To configure backup settings for reports:
- Click Reports on the left pane.
- Click on Saved Reports and select the Patch Report option.
- Select the Settings option beside the Asset Report.
- Report Settings (Patch Report) pop up will be displayed in the image below.
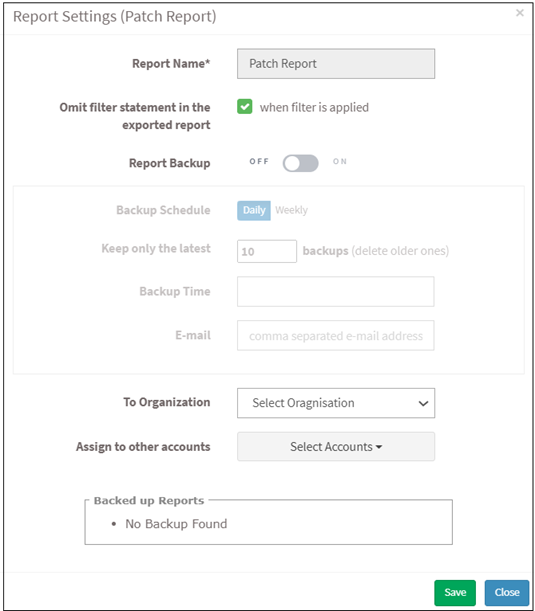
- Click the Omit filter statement in the exported report check box, and users can set the on/off button whether they want to back up the report.
- If the backup is on, select the weekly or daily option.
- Set a number in the Keep only the latest entry box. The report for the specified number of days is archived. If the number is three and the backup option is daily, then the reports from the last three days are maintained. Older files are deleted. You can maintain backups for a maximum of 30 days.
- Specify Email ID address. You can enter more than one email address with a comma-separated.
- Select the organization and accounts you want to apply these settings.
- Click on the Save button.
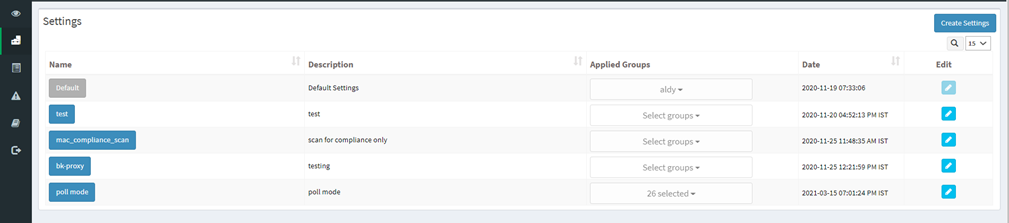
Click on the Create Settings button. By default, the scan scheduled time is 12:00 PM. Users can customize scan time and select any number of groups at the bottom and create the settings. Once the settings are created, the server will push these settings to an agent. Then the agent will start its daily scan at a scheduled time.

